
بروزرسانی: 15 آذر 1404
How to Approach SVG Animations: A CSS Tutorial
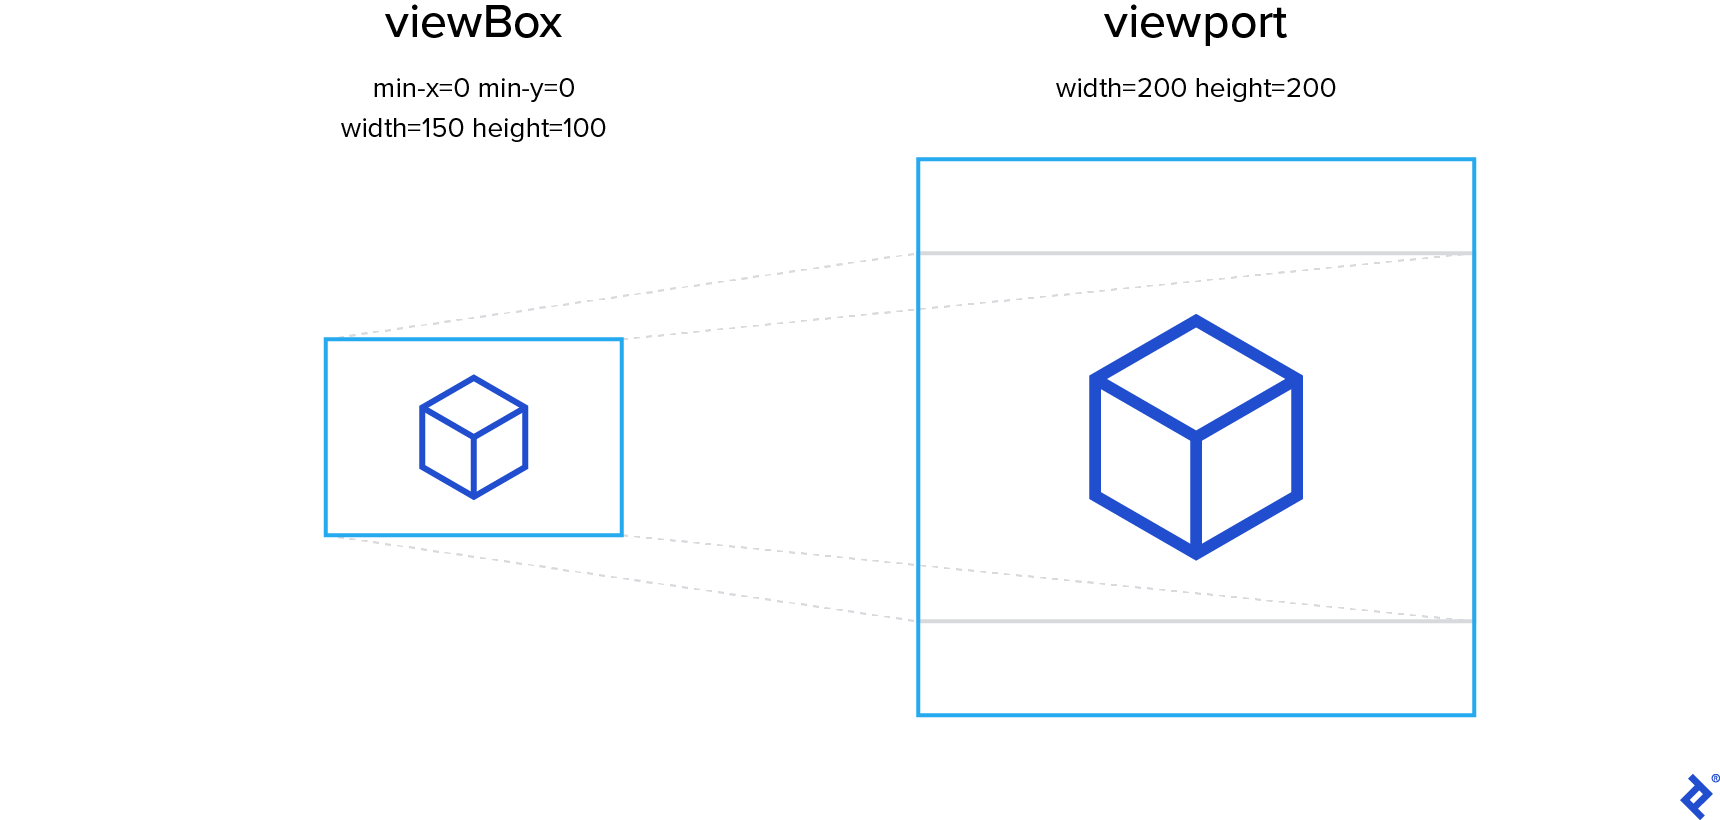
const hamburger = document.querySelector("button");hamburger.addEventListener("click", () => { hamburger.classList.toggle("is-opened");});width and height attributes of the viewport may indeed differ from the ratio of the width and height parts of the viewBox attribute.@keyframes pulse { 0% { transform: scale(0.9); } 40% { transform: scale(1) rotate(5deg); } 80% { transform: scale(1) rotate(-5deg); } 100% { transform: scale(0.9) rotate(0); }}CSS Animation Optimizations
Secondly, we know we want our 0% and 100% keyframes to match because we’re looping the animation. By defining them with the same CSS rule, we won’t have to remember to modify both of them if we want to change this shared point in the animation loop:
This is a subtle but valuable animation. It attracts the user’s attention, informing them that the icon can be used to close the menu.
Note that we applied CSS classes to SVG elements. There are many properties that can be changed via CSS, so let’s apply some basic styling to our SVG elements.
Our second SVG animation is a mute button showing a headphones icon. When the music is active, the icon will pulsate and dance; when it’s muted, the icon will be crossed out:
The next piece we’ll add is a strikethrough line that appears when the icon is inactive. As this is a simple design element, we can code it manually. This is where having simple and reasonable viewBox values is useful. We know that the edges of the canvas are at 0 and 100 so it is easy to calculate the start and end positions for our line:
Here, we select the outer SVG element by its .mute class using querySelector(). We then add a click event listener. When a click event is triggered, we toggle the .is-active class only on the <svg> itself—no deeper in the hierarchy. Because we made the CSS animation only apply to elements with the .is-active class, toggling this class will activate and deactivate the animation.
/* property name | duration | easing function | delay */transition: margin-right 4s ease-in-out 1s;Since our 100% keyframe sets the entire transform list, if we were to omit rotate() entirely, its value would default to 0:
Animations don’t have to be reserved for extravagant projects. Modern CSS animation techniques allow us to create a wide array of engaging and polished animations in a simple, cross-browser-compatible way.
Lastly, we’ll soon apply transform: scale(0.9); to the mute__headphones class, and when we do, we won’t need to define the starting and ending keyframes at all! They’ll default to the static style used by mute__headphones.
Animations are a ubiquitous part of the web. Unlike the flashing GIF images that plagued websites in the internet’s earlier days, today’s animations are more subtle and tasteful. Designers and front-end specialists use them to make websites look more polished, enhance the user experience, call attention to important elements, and convey information.
We’ve only scratched the surface of CSS animation techniques and how viewports work. It’s worth knowing how to write SVG code by hand to keep simple animations simple, but it’s also important to know how and when to make use of graphics created with external editors. While modern browsers enable us to create impressive animations using only built-in functionality, for (very) complex use cases, developers might want to explore animation libraries like GSAP or anime.js.
0%, 100% { transform: scale(0.9); }In order to create our X, we can apply a different transform property to our hamburger bars. Because the new transform property will override the old one, our starting point will be the original, shared position of the three bars.
The path element allows us to draw lines, curves, and arcs. Paths are described with a series of commands that describe how the shape should be drawn. As our icon consists of three unconnected shapes, we have three paths to describe them.
We apply the animation using the animation CSS property but only when the .is-active parent class is present, similar to how we animated our hamburger menu.
If we render at this point, we’ll see that all three lines have the same size and position, overlapping each other completely. Unfortunately, we can’t change the starting and ending positions independently via CSS, but we can move whole elements. Let’s move the top and bottom bars with the transform CSS property:
To animate CSS properties over multiple keyframes, first we need to define the keyframes using an @keyframes at-rule. The timing of keyframes is defined in relative units (percentages) because at this point, we haven’t yet defined the animation duration. Each keyframe describes the values of one or more CSS properties at that point in time. CSS animations will ensure smooth transitions between keyframes.
In real-world scenarios you might want to combine more complex SVG content from several different sources. This is where making them all a uniform size is useful, as we can’t manually hard-code the relative values like we did in our example.
